Making a start on designing competency-based training programs and training sessions

The TAEDES412 Design and develop plans for vocational training unit of competency will require the TAE Student to:

  • design and develop plans for group learning that covers at least 2 entire units of competency
  • design and develop the detail for 3 consecutive training sessions for each different unit of competency.

Designing a group-based training program

The following information focuses on designing a training program that covers one unit of competency. If you are a TAE Student, you will need to do the following twice because you will required to design a training program that covers two units of competency. Avoid integrating the delivery of the two units because this will make it more complicated than it needs to be. Keep you approach as simple as possible.

The TAEDES412 unit does not specify the duration a training session. It does not specify that the training plan covering a unit of competency must consist of 30-minute training sessions. The duration of 30 minutes is not a realistic timeframe for a training session to train a group of learners. When designing a training program, I start by creating a training agenda consisting of one-hour blocks of time.

The following shows the outline for a 3-day training program with 6 one-hour blocks of time for each day.

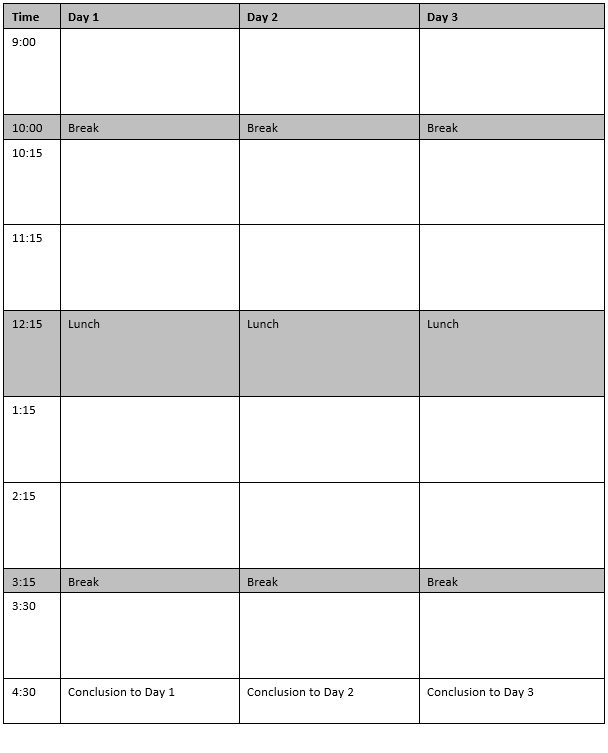
Most units of competency in the Australian VET system will require more than one training day. The total training duration will usually be between 2 and 5 days.

The one-hour block of time structure is simple and makes it easier to figure out the chunking and sequencing of content to be delivered. And remember to factor in time for learning activities, including the practice of skills and tasks. I like to allocate at least 50% of the available time for conducting learning activities.

I design the training using one hour as the duration for a ‘standard training session’. Sometimes a period of time greater than one hour is required. This usually is required to cater for learning activities that need more time, such as, case studies or role playing.

The following shows two examples of training sessions with a duration greater than one hour:

  • Day 1 has used two one-hour blocks of time for a two-hour training session
  • Day 3 has used three one-hour blocks of time for a three-hour training session.

Design three 30-minute training sessions

The TAEDES412 Design and develop plans for vocational training unit of competency requires the TAE Student to design and develop the detail for 3 consecutive training sessions for each different unit of competency.  And the TAEDEL411 Facilitate vocational training unit of competency requires the TAE Student to deliver a series of 3 sequential training sessions of at least 30 minutes duration each to a group of at least 4 learners.

The following table compares the requirements specified by the TAEDES412 unit and the TAEDEL411 unit.

Many RTO delivering the TAE40122 Certificate IV in Training and Assessment qualification will ask their TAE Student to design, develop and deliver a series of 3 sequential training sessions. Unfortunately, there can be a disconnect between designing a realistic training program consisting of training sessions with a duration that are greater than 30 minutes and the requirement of delivering 30-minute training sessions.

The duration of 30 minutes for training sessions is unrealistic. The timeframe of 30 minutes was influenced by RTOs delivering the Certificate IV in Training and Assessment qualification. These RTOs wanted to make it easier for themselves to organise the observation of training sessions being delivered by their TAE Students, and minimise the time consumed by their assessors. The timeframe was not based on the ‘real’ requirements and duration of delivering this type of training session.

If you are a TAE Student, it is best to think that the 30-minute training sessions are an exercise to prove you can deliver training. These training sessions do not represent what happens in the real world. This raises a question: how do you deign a realistic training program and then extract a series of 3 sequential 30-minute training sessions for delivery?

After you have designed the training program covering the unit of competency, split the one-hour blocks of time in half and select a series of three 30-minutes to be your training session to deliver.

The following shows an example of picking three 30-minute blocks of time that can form the basis for a series of 3 sequential 30-minute training sessions.

In conclusion

The total duration of training will need to be estimated before staring to design the competency-based training program. This is required to know how many columns your training agenda will need.

Design the training program using one-hour blocks of time. Blocks of time can be merge to create training sessions with a duration that is greater than one hour.

Recognise the disconnect between the requirements specified by the TAEDES412 Design and develop plans for vocational training unit of competency and the TAEDEL411 Facilitate vocational training unit of competency. Identify 90 minutes from your competency-based training program that can be transformed into series of 3 sequential training sessions for delivery.

Do you need help with your TAE studies?

Are you a doing the TAE40122 Certificate IV in Training and Assessment, and are you struggling with your studies? Do you want help with your TAE studies?

Ring Alan Maguire on 0493 065 396 to discuss.

Contact now!

logo otws

Training trainers since 1986

Quickly turn PowerPoint slides into Handouts in 5 easy steps

If you are a TAE Student, you are likely to be encouraged or required to create visual aids and handouts. A common visual aid are PowerPoint slides. These PowerPoint slides can be quickly transformed into a handout.

Step 1. Prepare PowerPoint slides for the handout

Make a copy of your PowerPoint slides and remove slides that you do not want included in the handout. For example, you may have slides with quiz answers or administrivia that should be removed.

Step 2. Select ‘Print to PDF’

The handout shall be created as a PDF files. Go to the ‘Print’ function and select ‘Print to PDF’.

Step 3. Open ‘Print Layout’

Use the drop-down menu to open ‘Print Layout’ options.

Step 4. Select ‘Handout 3 Slides’

There is a range of handout layouts. Generally, I have found the 3 slides to each page as the most useful layout. This layout provides space for the learner to write their own notes relating to each slides.

Step 5. ‘Print’ and save PDF file

Select ‘Print’ and then you will need to select the location where you want to save the PDF file. This PDF file can be sent to your learners electronically or printed on paper and given to your learners.

In conclusion

Creating a handout from your PowerPoint slides is quick and easy. If you are a TAE Student, this can save you time so that you can move onto other things.

There are some advanced features such as adding RTO details, copyright details, version number or other information to the handout. This is done from the ‘Handout Master’.

What if you don’t have PowerPoint slides?

If you must create a handout and you don’t have PowerPoint slides, then you will need to develop a document. But this needs to be a topic for another article.

Other related articles that I have published are:

Do you need help with your TAE studies?

Are you a doing the TAE40122 Certificate IV in Training and Assessment, and are you struggling with your studies? Do you want help with your TAE studies?

Ring Alan Maguire on 0493 065 396 to discuss.

Contact now!

logo otws

Training trainers since 1986

Why are examples and demonstrations important during training?

It is unbelievable that some RTOs delivering the TAE40116 or TAE40122 Certificate IV in Training and Assessment qualification are bad at giving examples. Sometimes examples are provided but they don’t help to clarify what needs to be done. Sometimes examples are provided but they are not consistent with the templates that are to be used. And sometimes no or very few examples are provided.

RTOs delivering the TAE qualifications should provide a model of good practice. This allows TAE students to learn what to do from good experience rather than learn what not to do from bad experience. Also, I cannot believe that ASQA has allowed RTOs to deliver such an important qualification with deficient learning resources. This is probably an outcome from a regulator that relies on RTOs to self-regulate .

The importance of examples and demonstrations

Examples and demonstrations are incredibly important during training for a variety of reasons. Here are three of those reasons:

  • Enhanced understanding
  • Improved engagement and motivation
  • Skill development and confidence building.

Enhanced understanding

Concepts come to life: Abstract ideas can be difficult to grasp. By providing concrete examples and demonstrations, learners can see and experience the concept in action, making it more relatable and easier to understand.

Bridges the gap between theory and practice: Training often involves learning theoretical knowledge. Examples and demonstrations show how to apply that knowledge in practical situations, creating a clear connection between the two.

Visual learners benefit: Not everyone learns best through listening to trainers or reading. For visual learners, seeing examples and demonstrations is crucial for effectively processing and retaining information.

Improved engagement and motivation

More interesting and interactive: Training with examples and demonstrations can be more engaging and interactive than lectures or reading alone. This can keep learners more interested and motivated, leading to better learning outcomes.

Provides opportunities for active participation: Learners can participate in discussions about the examples, ask questions, and even practice the demonstrated skills themselves. This active participation further enhances engagement and learning.

Reduces cognitive load: Examples and demonstrations can break down complex information into smaller, more manageable chunks, making it easier for learners to process and remember. This reduces cognitive load and promotes better understanding.

Skill development and confidence building

Seeing things done correctly: By seeing completed examples, learners can get clarity about what needs to be done and expected standards. And by observing a demonstration, learners can learn the proper technique and avoid common mistakes. This leads to faster skill development and improved performance.

Provides a chance to practice: Demonstrations can be followed by guided practice, allowing learners to apply what they learned in a controlled environment. This builds confidence and helps them refine their skills.

In conclusion

Overall, examples and demonstrations are powerful tools that can significantly enhance the effectiveness of training. They make learning more engaging, improve understanding, and promote skill development, ultimately leading to better performance and improved outcomes.

A recent poll of TAE40116 or TAE40122 Certificate IV in Training and Assessment students found that 40% were being given good examples from their RTO, but 60% said that no or sub-standard examples were provided by their RTO. It is a shame, and it is ironic, that many TAE students are experiencing ‘bad practice’ from RTOs during their TAE course, rather than ‘good practice’.

Do you need help with your TAE studies?

Are you a doing the TAE40122 Certificate IV in Training and Assessment, and are you struggling with your studies? Do you want help with your TAE studies?

Ring Alan Maguire on 0493 065 396 to discuss.

Contact now!

logo otws

Training trainers since 1986

7 actionable strategies to enhance the clarity and impact of your training handouts

If you are a TAE40116 or TAE40122 Certificate IV in Training and Assessment student, you will be required to find, customise and use learning resources. A common learning resource is the training handout.

Creating professional and effective training handouts is crucial for ensuring that your learners grasps and retains the information you’re presenting. Here are seven strategies to help you develop high-quality training handouts.

  1. Consistent formatting
  2. Visual appeal
  3. Organised structure
  4. Engaging content
  5. Clarity and simplicity
  6. Include practical exercises
  7. Headers and footers

1. Consistent formatting

Maintain a consistent and professional layout throughout the handout. Use a clean and readable font, appropriate font size, and consistent formatting for headings, subheadings, and bullet points.

The following illustrates the differences between three font types.

Usually, Microsoft Word uses the Calibri font and 11-point font size as the default settings. This is a clean and readable font, and the 11-point font size is likely to be appropriate for most situations.

Here are three general rules to enhance a handout’s readability:

  • Avoid the overuse of bold text, italic text, and underlined text
  • Use ‘left alignment’ for all headings and text
  • Don’t ‘justify’ the text.

The following are my recommendations for font type and size of headings, sub-headings and text.

2. Visual appeal

Incorporate visuals like charts, graphs, and images to enhance understanding. Ensure that visuals are relevant, high-quality, and contribute to the overall clarity of the content.

Don’t breach copyright.

Don’t use irrelevant images.

Don’t ‘decorate’ your handout.

Do use ‘white space’ to enhance the visual appeal and readability.

3. Organised structure

Organise information logically, following a clear structure. Use headings, subheadings, and bullet points to break down content into easily digestible sections. Consider a chronological order or a step-by-step approach.

4. Engaging content

Keep the content engaging by using a conversational tone and avoiding overly technical jargon. Include examples and real-life scenarios to illustrate key points and make the material relatable.

5. Clarity and simplicity

Ensure that your language is clear and concise. Avoid unnecessary complexity and use simple language to convey your message. Be mindful of the reading comprehension level of your learners.

6. Include practical exercises

Integrate practical exercises or activities within the handout. This encourages active participation and helps reinforce learning. Include space for participants to jot down their thoughts or answers.

7. Headers and footers

Use headers and footer for recording information about the handout, such as:

  • Title of handout
  • Unit code and title (if applicable)
  • Copyright or organisation’s details
  • Version number
  • Page number.

In conclusion

By adhering to these guidelines, you can create training handouts that are not only professional but also effective in facilitating a successful learning experience for your learners.

It is highly likely that a TAE40116 or TAE40122 Certificate IV in Training and Assessment student will be encouraged to develop training handouts using a word processing application, such as, Microsoft’s Word. I acknowledge that Word is not the only word processing application, but it is commonly used. You will likely need the ability to use key features and functions of Microsoft Word, such as:

  • Use ‘copy and paste’
  • Change font type and size
  • Use ‘Format Painter’
  • Create bullet points and numbered lists
  • Insert and format tables
  • Insert headers and footers
  • Insert images (pictures, icons, graphs, etc.)
  • Change page orientation (portrait, landscape)
  • Use spell check.

After reading this article, you may like to read another relevant article that I have recently published. It is titled, ‘Finding, customising and using learning resources‘.

Do you need help with your TAE studies?

Are you a doing the TAE40116 or TAE40122 Certificate IV in Training and Assessment, and are you struggling with your studies? Do you want help with your TAE studies?

Ring Alan Maguire on 0493 065 396 to discuss.

Contact now!

logo otws

Training trainers since 1986

Finding, customising and using learning resources

If you are a Certificate IV in Training and Assessment student, you will be required to find, customise and use learning resources.

A learning resource may include:

  • Learner Guide or textbook
  • Fact Sheet, Information Sheet, etc.
  • Handout or activity sheet
  • Presentation aid.

And a presentation aid may include:

  • Slide show presentation application
  • Physical object (prop, model, etc.)
  • Whiteboard or poster.

A 5-step process

The following is a 5-step process for finding, customising and using learning resources:

  • Step 1. Search for existing learning resources
  • Step 2. Review learning resources (Performance Criteria 1.3)
  • Step 3. Customise or develop learning resources (Performance Criteria 2.2)
  • Step 4. Prepare learning environment and check equipment prior to use (Performance Criteria 3.1)
  • Step 5. Use presentation aids (Performance Criteria 3.4).

The above steps have referenced the relevant Performance Criteria from the TAEDEL411 Facilitate vocational training unit of competency. However, the development and use of learning resources is applicable to several TAE units of competency. Therefore, it is highly likely that a Certificate IV in Training and Assessment student will be required to develop and use learning resources many times throughout their training program.

Step 1. Search for existing learning resources

If you’re working for a training provider, you may have access to existing learning resources. And if you don’t have access to existing learning resources, you could search for learning resources on the internet. Some people think that they can freely use whatever resources they find on the internet. We must think that all resources are copyright. Some copyrighted resources can be freely used, but the use of many copyrighted resources is prohibited.

Step 2. Review learning resources

When reviewing learning resources before use, trainers should consider a variety of criteria to ensure the resources are effective, engaging, and appropriate for their learners. Here are some key aspects to consider.

  • Accuracy and currency: Does the information presented align with current industry standards and best practices? Are facts and figures reliable and verifiable?
  • Relevance and alignment: Does the content directly address the learning objectives and target the specific needs of the learners? Is it aligned with the unit of competency or training program?
  • Read-ability or usability: Is the information presented in a clear, concise, and well-organised manner? Are key concepts and ideas easily identified and understood?
  • Cost and availability: Is the resource readily available and affordable for the trainer and learners? Does it fall within budget constraints or licensing agreements?

In addition to the above criteria, check that copyright allows the resource to be used or customised.

Step 3. Customise or develop learning resources

The customisation or development of a learning resource can be time-consuming. Various factors will determine how much time it takes to create the learning resources to support the delivery of a training session. One factor is a person’s computer skills, such as:

  • Ability to use Microsoft Word for producing handouts
  • Ability to use Microsoft PowerPoint for producing presentation slides
  • Ability to ‘copy and paste’ and modify content from the internet
  • Ability to use artificial intelligence (AI) to generate content.

Handouts

Limit the size of your handout. A one, two or three-page handout may be sufficient for a 30-minute training session. However, the number of pages may be more than three, if required.

Here is a short list of qualities for a professional handout:

  • Heading at the top of the handout
  • Simple and consistent style and layout
  • Reference to unit of competency, if relevant
  • Photos, illustrations and diagrams, if appropriate
  • Page numbers and version number
  • Correct grammar and spelling.

Handouts can provide learners with information or can be used to support learning activities. Scenarios, case studies, research questions, discussion questions, quizzes and exercises are some of the ways a handout can become an activity sheet. A handout can be a combination of information and activities.

PowerPoint slides

It is highly likely that a Certificate IV in Training and Assessment student will be encouraged to develop and use a slide show presentation application, such as, Microsoft’s PowerPoint. I acknowledge that PowerPoint is not the only slide show presentation application, but it is commonly used.

Here is a short list of qualities for professional PowerPoint slides:

  • Heading at the top of each slide
  • Simple and consistent style and layout
  • Reference to unit of competency and version control
  • Key points (bullet points and sub-bullet points)
  • Icons, photos, illustrations and diagrams
  • Correct grammar and spelling.

PowerPoint can be used to quickly create a handout. For example, use the ‘Microsoft Print to PDF’ feature, and under ‘Settings’ select ‘Handouts (3 slides per page)’.

Step 4. Prepare learning environment and check equipment prior to use

It is a good idea to list the learning resources and equipment required for the training session. Also, it is a good idea to list the things to be done to prepare the learning environment before commencing the training session; for example:

  • Print sufficient copies of handouts
  • Ensure learning environment is clean, tidy and safe
  • Set up tables and chairs with an appropriate layout
  • Check projection equipment and speakers
  • Display the first PowerPoint slide.

You may want to add make coffee or fill up water bottle to your list.

The physical set up of the learning environment is not required when the training is delivered by a video conferencing application, such as, Zoom or Microsoft’s Teams. However, the trainer will need to ensure learners have access to the learning resources. This may include emailing information, documents or links to documents to the learner before commencing the training session.

Step 5. Use learning resources and presentation aids

The final step is to use the learning resources and presentation aids. After delivering your training session, it is a good practice to review the effectiveness of the learning resources and presentation aids we have used.

In conclusion

Finding existing learning resources can be difficult, and the customising or development of learning resources can be time-consuming.

If you are a Certificate IV in Training and Assessment student, my TAE tutoring service can save you time and help you develop effective learning resources to support the delivery of your 30-minute training sessions. I can assist you with internet search strategies to find existing learning resources. I can help you use the main features and functions of Microsoft Word to develop handouts and activity sheets. And I can help you use the main features and functions of PowerPoint to develop and display information. I can help you learn:

  • How to use Microsoft Word for producing handouts
  • How to use Microsoft PowerPoint for producing presentation slides
  • How to ‘copy and paste’ and modify content from the internet
  • How to use artificial intelligence (AI) to generate content.

Do you need help with your TAE studies?

Are you a doing the TAE40122 Certificate IV in Training and Assessment, and are you struggling with your studies? Do you want help with your TAE studies?

Ring Alan Maguire on 0493 065 396 to discuss.

Contact now!

logo otws

Training trainers since 1986